Newton's Laws - Lesson 2
Force and Its Representation
Drawing Free-Body Diagrams

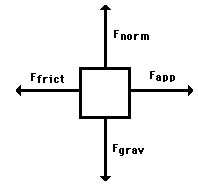
- Free-body diagrams are diagrams used to show the relative magnitude and direction of all forces acting upon an object in a given situation.
- A free-body diagram is a special example of the vector diagrams that were discussed in an earlier unit. These diagrams will be used throughout our study of physics.
- The size of the arrow in a free-body diagram reflects the magnitude of the force.
- The direction of the arrow shows the direction that the force is acting.
- Each force arrow in the diagram is labeled to indicate the exact type of force.
- It is generally customary in a free-body diagram to represent the object by a box and to draw the force arrow from the center of the box outward in the direction that the force is acting.
- An example of a free-body diagram is shown at the right.
The only rule for drawing free-body diagrams is to depict all the forces that exist for that object in the given situation. Thus, to construct free-body diagrams, it is extremely important to know the various types of forces.
If given a description of a physical situation,
- begin by using your understanding of the force types to identify which forces are present.
- Then determine the direction in which each force is acting.
- Finally, draw a box and add arrows for each existing force in the appropriate direction;
- label each force arrow according to its type. If necessary, refer to the list of forces and their description in order to understand the various force types and their appropriate symbols.
 Student Extras
No comments:
Post a Comment